Active Directory (AD), a service provided by Microsoft, functions as a central database for securely storing and managing information about user accounts, groups, applications, and other critical resources. It primarily functions as a directory service for Windows domain networks. Windows Server 2016, the eighth version of Windows Server operating system, was launched in 2016. In comparison to the earlier versions, Windows Server 2016 has multiple improved features for AD, such as privileged access management, Windows Hello for Business, and single sign-on features.
Follow these steps to migrate your AD from Windows Server 2003 to Windows Server 2016:
1) Installing Windows Server 2016
Before migrating AD from Windows Server 2003, Windows Server 2016 must first be installed on a new system.
2) Configuring the IP addresses in Windows Server 2016
After the installation process is complete, the IP address must be configured on the new Windows Server 2016. The following are the prerequisites:
- The existing domain and the IP address must be located in the same subnet.
- The DNS server should remain the same as it is in the existing domain.
3) Joining the Windows Server 2016 with AD from the Windows Server 2003 domain
Once the required IP settings are made, Windows Server 2016 will be joined with the existing AD from the Windows Server 2003 domain.
- Open the Server Manager in Windows Server 2016.
- Click on Local Server in the left pane.
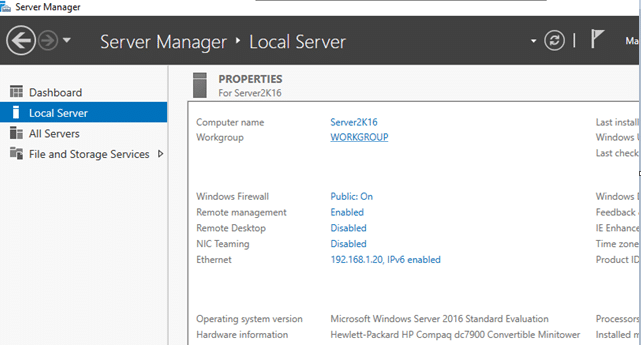
- Select the Workgroup and click Change.
- In the Computer Name/Domain Changes dialog box, type the name of the existing domain (xyz.local) in the Member of Domain option.
- In the user name field, type Administrator, enter the domain administrator account password, and click OK.
- Restart the system to complete the process and apply the changes made.
4) Logging in to the Windows Server 2016
Once the restart process is completed, follow the following steps to log in using the domain administrator account:
- Press Ctrl + Alt + Del.
- Once the login screen is displayed, click on the Other User option.
- In the user name field, enter the domain name in this format:
- “DomainName\Administrator” (for instance, “xyzdomain\Administrator”).
- Enter the password and click Enter to log in.
5) Raising the functional levels of domains and forests
- Open Active Directory Users and Computers in Windows Server 2003.
- Right-click on the domain name and choose Raise Domain Functional Level.
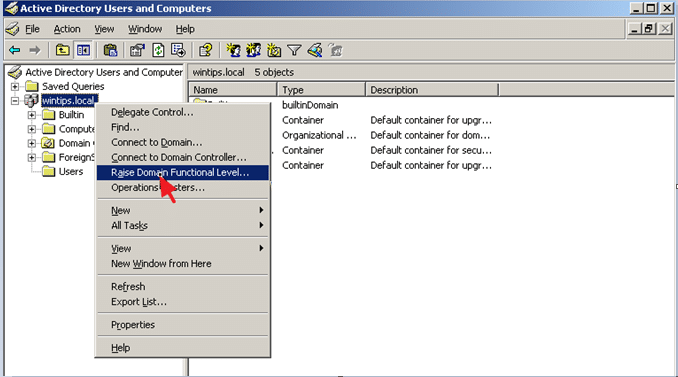
- Choose Windows Server 2003 from the drop-down list.
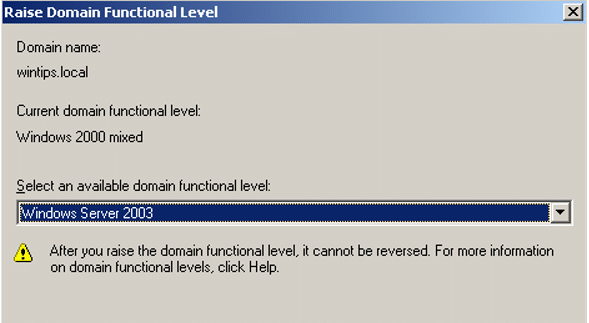
- Click Raise and select OK when the warning message is displayed.
- Once the functional levels are raised, click OK when prompted by the information message.
- Click and open Active Directory Domain and Trusts.
- Choose Raise Forest Functional Level.
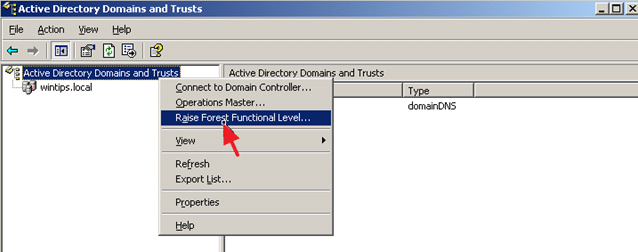
- Ensure that Windows Server 2003 is selected.
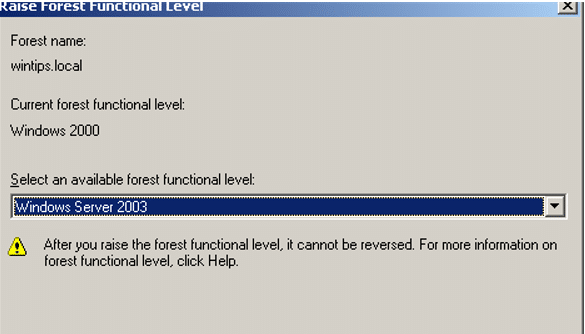
- Click Raise and select OK.
6) Adding the AD domain services to Windows Server 2016
Follow the below steps to add the AD services to Windows Server 2016 and promote it as a domain controller (DC):
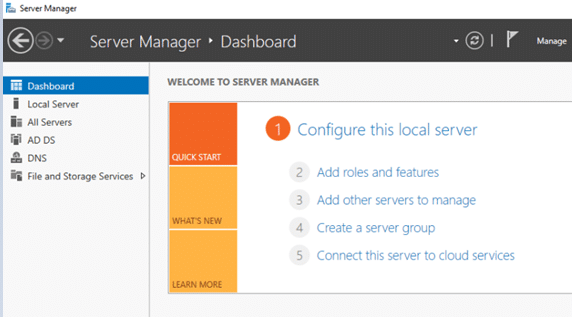
- Open the Server Manager in Windows Server 2016.
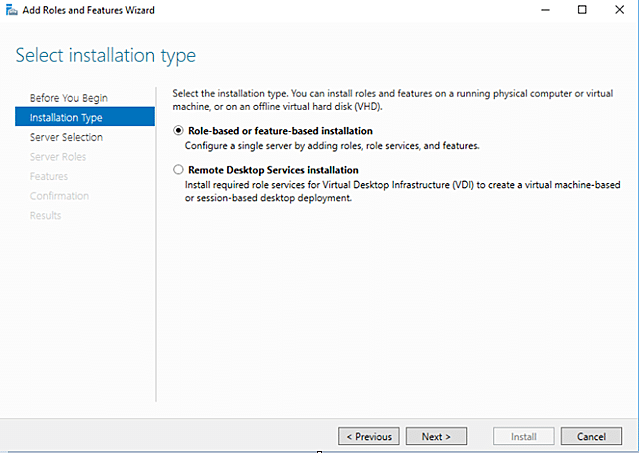
- Select Add Roles and Features.
- Click Next when prompted at the information window.
- Select role-based or feature-based installation and click Next.
- The Select Destination Server dialog box will be opened.
- Click on the Server Selection option from the left pane.
- Choose the Select a server from the server pool option and select the new Windows Server 2016 as the destination server, Click Next.
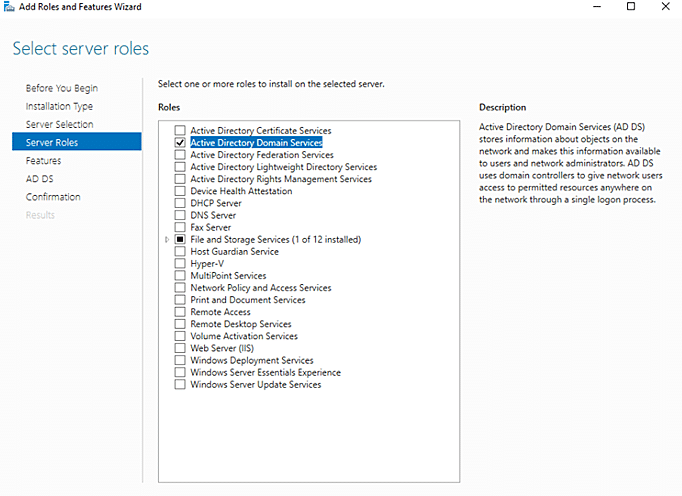
- Select Active Directory Domain Services, choose Add Features, and click Next.
- If required, select Restart the destination server automatically and click Yes.
- Select Install to begin the installation process. Once complete, click Next.
7) Promoting the new server as DC
Follow these steps to promoted the Windows Server 2016 as the domain controller:
- Choose Promote this server.
- Choose Add a domain controller to an existing domain and check if the existing domain name is selected.
- In the Domain Controller Options field, no changes to the default settings are required.
- For the Directory Services Restore Mode, enter the domain administrator password and select Next.
- When the Additional Options screen is displayed, choose the option to replicate from the old AD server 2003 and select Next.
- No changes need to be made to the default paths. Select Next.
- Once the Prerequisites Check is successful, select Install. The installation process and restarting the server may take several minutes.
8) Transferring the Operations Master role to Windows Server 2016
The role of the Operations Master should be transferred from the Windows Server 2003 to the Windows Server 2016. Follow these steps:
- Open the Server Manager on Windows Server 2016.
- Choose Active Directory Users and Computers.
- Click Operations Masters.
- Select Change from the RID tab and choose Yes.
- On successful transfer, select OK.
- Click Change from the PDC tab and select Yes.
- Select Change from the Infrastructure tab and select OK.
- Once the role has been transferred and the changes are displayed in all tabs, select Close.
9) Changing the AD DC to Windows Server 2016
Follow these steps to change the AD DC to Windows Server 2016:
- In the Server Manager, select the Tools menu and choose Active Directory Domains and Trusts.
- Select the Change Active Directory Domain Controller option.
- Check if the Current Directory Server is the new one and select OK.
10) Changing the domain naming master role
- Open Active Directory Domains and Trusts.
- Choose the Operations Master.
- Select Change to transfer the domain naming master role to the new Windows Server 2016 and choose Yes to confirm it.
- Select OK.
11) Changing the schema master role
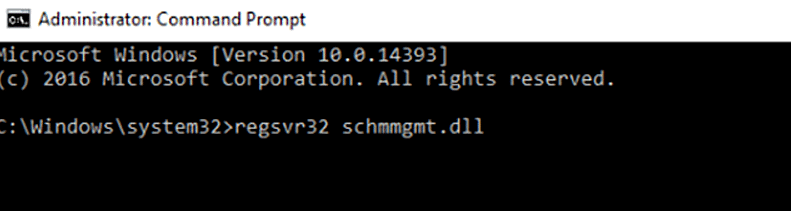
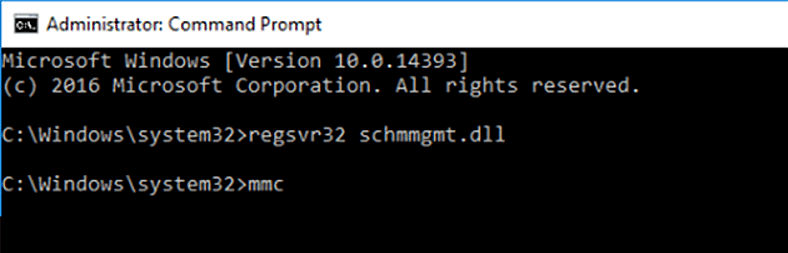
- On the new Windows Server 2016, open the Command Prompt.
- Run the following command:
xyzdomain schmmgmt.dll
- Select OK when prompted at the information message.
- Enter mmc and click Enter.
- Once the MMC console is opened, select File and choose Add/Remove Snap-in…
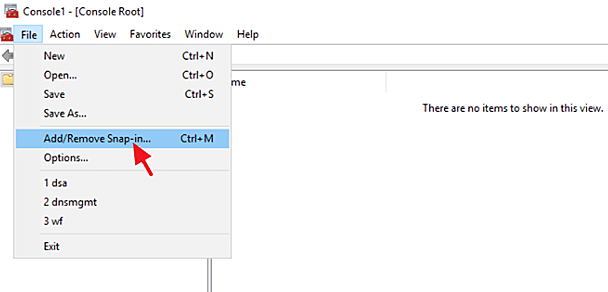
- On the left pane, choose the Active Directory Schema.
- Click on Add and select OK.
- In the MMC console, select Change Active Directory Domain Controller.
- Once the Change Directory Server window is open, choose the new Windows Server 2016 and select OK.
- Select Yes and choose OK when prompted.
- Select Operations Master from the Active Directory schema.
- Select Change and OK to close the window.
12) Verifying the transfer of FSMO roles
- Open the Command Prompt on the new Windows Server 2016.
- Run the following command:
xyz query fsmo
- Check and verify if all the FMSO roles have been transferred from the old server.
13. Removing the old server from the global catalogue
- Open Active Directory Users and Computers on the new server.
- Select Domain Controllers.
- Right-click on the old server name and select Properties.
- Choose NTDS Settings.
- If the box next to Global Catalog is checked, uncheck it and select OK.
- The replication process will take a few minutes to complete.
14. Modifying the preferred DNS address
- Open the Network and Sharing Center on the old server.
- Select Properties from the Local Area Connection.
- Click on Internet Protocol TCP/IP.
- Change the Preferred DNS server address to the new server IP address.
- Change the Alternate DNS server address to the old server IP address.
- Select OK.
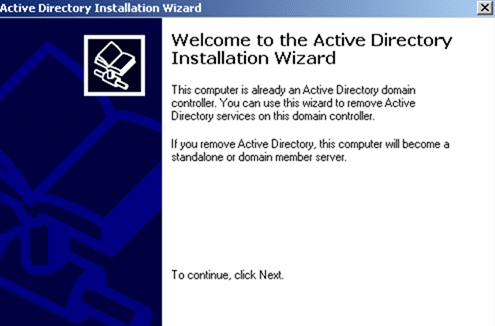
15. Demoting the old server from DC
Follow these steps to remove the AD services from the old Windows Server 2003:
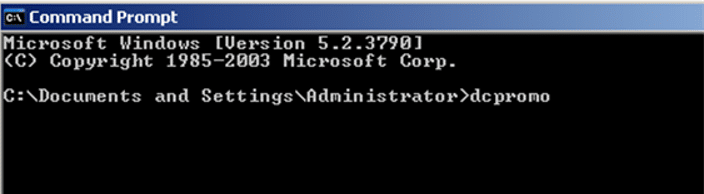
- Open the Command Prompt on the Windows Server 2003.
- Run the following command:
dcpromt
- Select Next when prompted by the Active Directory Installation Wizard to remove AD from the old server.
- The local administrator account will require a new password. Enter a new password and click Next.
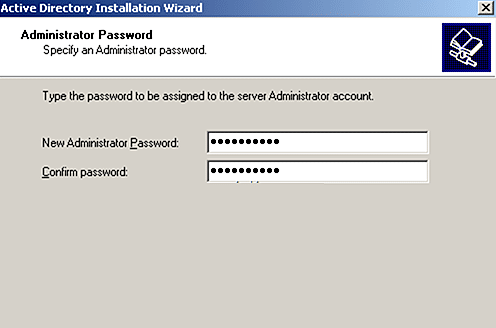
- The remaining data will be transferred to the new Windows Server 2016. Once the transfer is complete, click Finish.

- Restart the system to apply the changes.


