Group Policy Management Console: An Introduction
The Group Policy Management Console (GPMC) is a one-stop solution for performing all the Group Policy functions an administrator has to deal with. This MMC snap-in provides all the information about Group Policies and allows one to view all the settings within a Group Policy Object (GPO). Many of the functions of the GPMC can also be scripted. The GPMC provides viewing, configuring, and analyzing GPO settings to know how they will affect target computers and users.
Here is a partial list of what administrators can do with the GPMC:
- Creating, modifying, deleting, reporting GPOs and controlling their application
- Performing Group Policy searches across the forest and domain(s)
- Check/control status of GPOs
- Linking and unlinking GPOs
- Performing backup, restore and import of GPOs
- Executing GPO modeling sessions to understand the effects of GPOs
- Setting and delegating permissions
The following are some of the highlights of the GPMC which make it such a handy tool:
- Easy user interface with drag-and-drop functionality
- Capability to backup, restore, import and copy GPOs
- Includes programmable interfaces
- Execution of fully scriptable functions
- Manages WMI filtering that helps in selectively applying GPOs
How to install Group Policy Management Console tools
You can install the GPMC using the Server manager. Here’s how you can do it in Windows Server 2016:
- Open the Server Manager Dashboard. You can do this by pressing Windows + R keys to open the Run tool, and then typing servermanager and pressing the Enter button.
- In the Dashboard section, click on Add Roles and Features.
- In the installation wizard window that pops up, under Installation Type select Role-based or feature-based installation. Then, click Next.
- Under Server Selection, select the Select a server from the server pool option. Then, click Next.
- Click Next under Server Roles.
- Under Features, select Group Policy Management. Click Next.If prompted to install any supporting roles, accept the default selection.
- Under Confirmation, click Install.
Once the installation process is complete, you can open the GPMC through Server manager under the Tools section.
Opening the GPMC
Alternatively, you can also use one of the following methods to open the GPMC:
- Go to Start → Run. Type gpmc.msc and click OK.
- Go to Start → Type gpmc.msc in the search bar and hit ENTER.
- Go to Start –> Administrative Tools –> Group Policy Management.
Before diving into working with GPOs using the GPMC, let’s take a look at what a GPO is.
What is a GPO?
A Group Policy in Active Directory is stored in the form of Group Policy Objects (GPOs). GPOs can be created like any other active directory object and are linked to a Site, domain, or OU in which the policy settings have to be applied. Hence, GPOs are how you can manage group policies and configure them as necessary. To learn more about GPOs and GPO management, you can read this article.
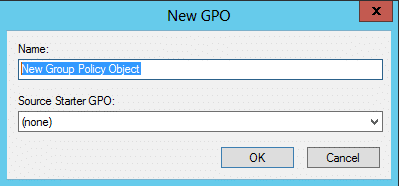
Creating an unlinked GPO
- Within the GPMC, right-click Group Policy Objects in the domain where the GPO is to be created and select New. Give it a suitable name.
- Click OK.
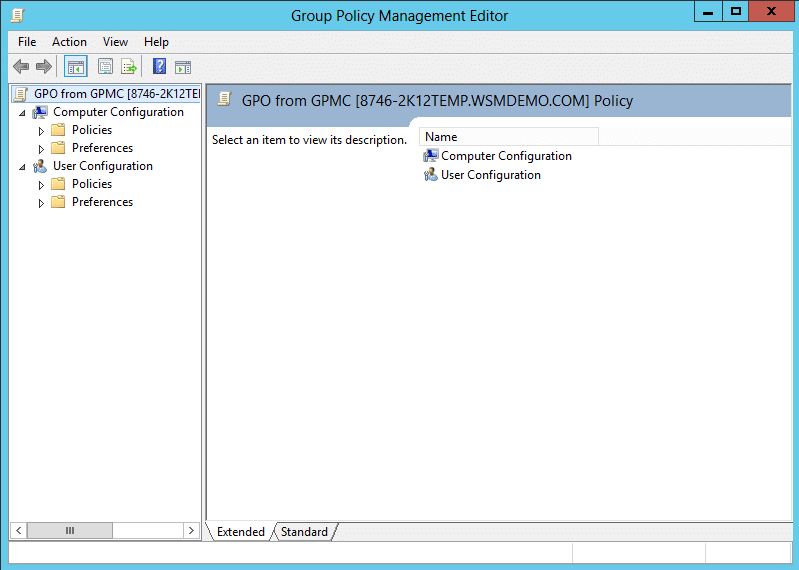
Editing a GPO
- In the GPMC, open the Group Policy Objects node.
- Right-click the appropriate GPO, and click Edit.
Deleting a GPO
- In the GPMC, open the Group Policy Objects node.
- Right-click the appropriate GPO, and click Delete.
- Click OK to confirm.
Note that it is best practice not to edit/delete the Default Domain Controllers Policy or the Default Domain Policy.
Let’s take a look at some of the other tasks that can be executed from the console.
Linking a GPO
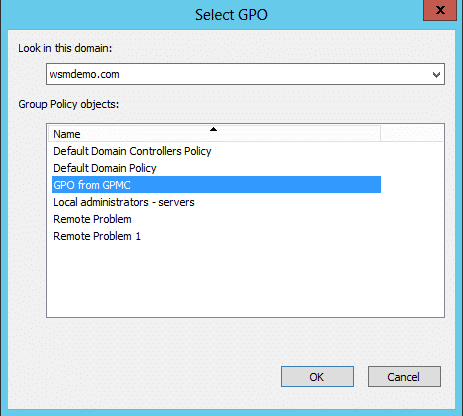
- In the GPMC, locate the domain or OU to which the GPO is to be linked and right-click.
- To link an existing GPO, select the option Link an Existing GPO. In the Select GPO dialog box that appears, select the GPO that is to be linked and click OK.
- To link a new GPO, select the option Create a GPO in this domain, and link it here. Give a suitable name and click OK.
Disabling a GPO link
- In the GPMC, locate the GPO link which is to be disabled.
- Right click the GPO link and click Link Enabled. A check mark indicates that the link is enabled and the absence of it indicates that the link is disabled.
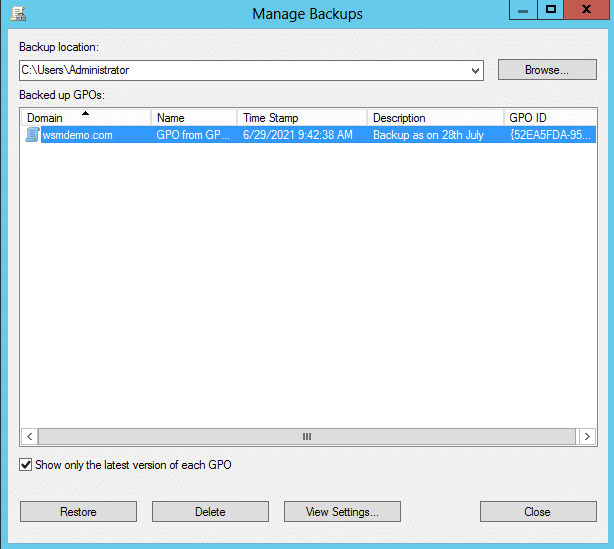
Managing GPO Backups
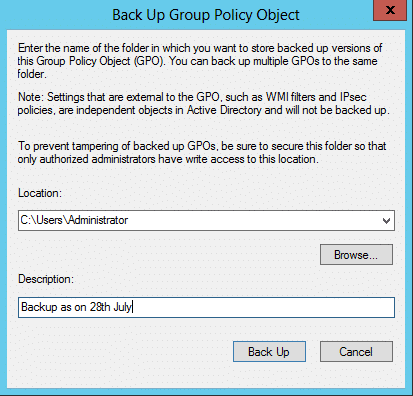
- In the GPMC, expand the Group Policy Objects node that contains the GPO that has to be backed up. Right-click the GPO, and then click Back Up.
- To back up all GPOs in the domain, right-click the Group Policy Objects node, and then click Back Up All.
- In the Back Up Group Policy Object dialog box, specify the path to the folder where the backed-up versions of the GPOs will reside. Click Back Up.
- Finally, click OK.
Restoring a GPO
- In the GPMC, expand the Group Policy Objects container. Right-click the GPO and then click Manage Backups.
- In the Manage Backups dialog box that appears, specify the path to locate the backup folder.
- From the list Backed up GPOs, select the GPO that needs to be restored, and click Restore.
- Confirm by clicking OK.
- Finally, click OK and then Close.
Importing settings from a GPO
- In the GPMC, expand the Group Policy Objects node. Right-click the GPO and then click Import Settings. The Import Settings Wizard opens.
- Click Next to continue.
- Backup the existing settings in the GPO by clicking Backup. Then click Next.
- Specify the path to the backup folder from which the settings are to be imported. Click Next.
- Select the GPO from which the settings are to be imported. Click Next.
- The wizard will automatically scan the settings in the backup to check for references needed. After the scan completes, click Next.
- Under Migrating References, select the method for transferring references. Click Next.
- Finally, click Finish to close the wizard.

Group Policy Modeling
Group Policy Modeling can simulate the policy implementation environment and can help administrators get a sense of how the GPOs affect different users and computers, thus helping them to plan before actually applying the policies.
The following steps illustrate how to work with the Group Policy Modeling Wizard:
- In the left pane of the GPMC, click on the forest to expand it.
- Right click the Group Policy Modeling container and click on the Group Policy Modeling Wizard option.
- In the Group Policy Modeling Wizard that is launched, click Next.
- Specify the domain where the GPO is to be analyzed and click Next.
- Specify the user and computer against which the policy settings are to be simulated. Click Next.
- In the page that follows, select a particular site if required, else skip to the final page and click Next.
- In the page that follows, specify an alternate network location if required, else skip to the final page and click Next. An alternate location can help administrators see the effects of the GPOs if the computer were to be moved to a different container in the AD.
- In the page that follows, use the Add/Remove options to simulate changes to all the security groups that the selected user is a member of if required, else skip to the final page and click Next.
- In the page that follows, include the WMI filters in the simulation if required, else skip to the final page and click Next.
- In the page that follows, a summary of all selections made in the wizard is displayed. To process the simulation click Next.
- Finally, click Finish to close the wizard.
This action creates a folder that can be seen in the left pane of the GPMC that bears the name of the user/computer that is tested. Open it to display the outcome of the simulation. These reports give information about the properties and policy settings of GPOs and how the implementation of group policy modeling proceeded/succeeded. The Summary tab gives information about the GPOs that were used to compile the policy. The Settings tab lists the effective policy settings. The Query tab displays the criteria based on which the simulation was carried out.
People also read
Managing GPOs in Active Directory


